


Free shipping


Only 1 left!
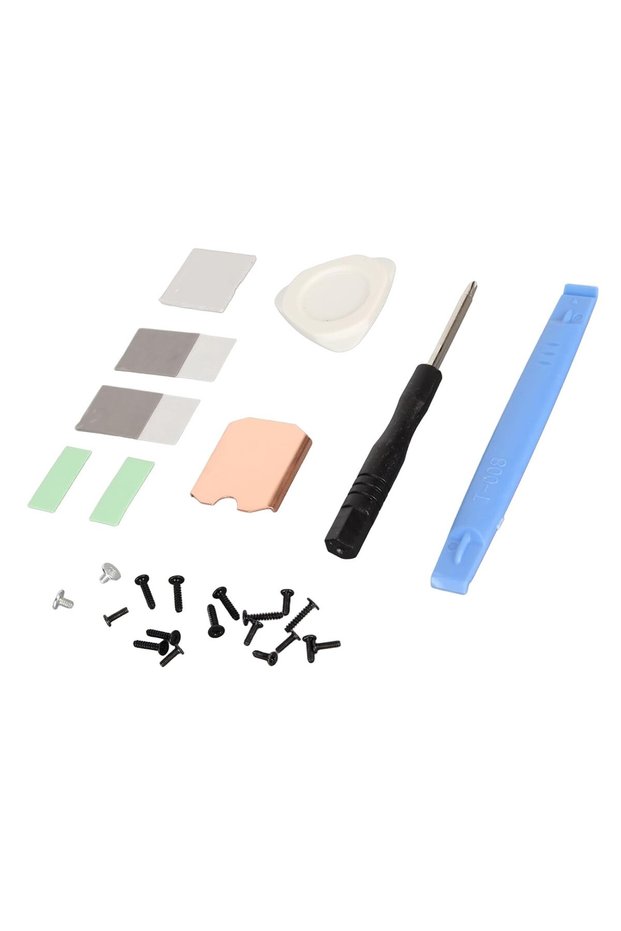
Generic M.2 2230 NVMe SSD Heatsink Copper Cooling Kit for Handhelds
No reviews yet.
-20%
123.67
SAR
154.59
(incl. VAT)
Free shipping
Delivery address

Select your address, find out the delivery date!
International delivery
Trendyol's commitments
Easy and free return in 15 days.
Payment methods



Highlighted features:
Generic M.2 2230 NVMe SSD Heatsink Copper Cooling Kit for Handhelds features
Color
Gold-colored
Available campaigns

Applied at checkout
GASDG
8.2
Seller information
Generic M.2 2230 NVMe SSD Heatsink Copper Cooling Kit for Handhelds reviews
No reviews yet.
Product details
Product description
Product description 1. SCOPE OF APPLICATION: SSD copper heat sink for Steam Deck and for ROG ALL , the installation is more convenient and easy, easy to meet your usage needs.
2. HEAT DISSIPATION: SSD heatsink thermal pad is made of pure copper material, which is not only very durable, but also has good heat dissipation performance to improve gaming experience.
3. INCLUDED: Includes 1 x 0.5mm / 0.02in Copper Heatsink, 2 x 0.13mm / 0.01in Phase Change Thermal Pads, 3 x 0.5mm / 0.02in Silicone Thermal Pads, 1 x , 1 x Split Pry Bar, 1 x Triangular Pry Tool, 18 x Screws.
4. PHASE CHANGE THERMAL PAD: Phase change silicone thermal pad not only improves heat dissipation, but also flattens the SSD to avoid bumping the cover.
5. STABLE OPERATION: Thermal copper sheet aids in passive heat dissipation, plus the high performance thermally conductive silicone sheet absorbs heat onto the top of the copper sheet, which quickly removes heat through the laptop's internal fan.
Spec: Item Type: For Steam Deck SSD Heatsink Thermal Pad Material: Copper, Silicone Heat Dissipation Copper Sheet Size: Approx.
26 x 23 x 0.5mm / 1.02 x 0.91 x 0.02in Compatible Brands: For Steam Deck, For ROG ALL Applicable Hard Disk: M.2 2230 NVME SSD How to Use: Hard Disk Cooling Installation Tutorial: 1. Turn off the for STEAM DECK.
Before replacing the hard disk, turn off the for STEAM DECK and unplug all cables.
2. Remove the eight screws on the back of the for STEAM DECK.
(1) Use a to unscrew the eight screws securing the back cover.
Four 9.5mm / 0.37in screws and four 5.8mm / 0.23in screws.
(2) Keep the screws during replacement to prevent loss.
3. Pry off the rear cover.
(1) Insert a tab along the edge of the right‐hand handle into the between the back cover and the front housing.
(2) Use the tab to pry up the rear cover and release the tab.
4. Remove the protective plate.
(1) Use a to unscrew the three screws securing the , one 3.4mm / 0.13in screw and two 3.7mm / 0.15in screws.
(2) Remove the screws and detach the .
5. Remove the SSD.
(1) Use a to unscrew the screws securing the SSD.
(2) Remove the fixing screws and pull out the hard disk.
6. Install the heat sink (1) Peel off the heat sink protective film.
(2) Tear off the protective film of the thermal paste and stick the thermal paste on the of the hard disk particles as shown in the picture.
(3) Align the heat sink with the hard disk and press it into the thermal slot.
7. Install the SSD.
Reinsert the SSD with the heat sink installed into the slot and tighten the screws PackageList: 1 x Copper Heat Sink 2 x Phase Change Thermal Pad 3 x Silicon Thermal Pad 1 x 1 x Open Pry Bar 1 x Triangle Pry Tool 18 x Screw 1 x Storage Box Notice: Please allow some error due to manual measurement.
Additional info
- A maximum of 5 units of this product can be ordered. Trendyol reserves the right to cancel orders over 5 units.
- Sold by .
- Barcode No: CofLt8gTPfBC7dGAyeFwJ6vkmA4tQNU7C5c9G
Generic M.2 2230 NVMe SSD Heatsink Copper Cooling Kit for Handhelds features
Color
Gold-colored
Safety information
Product safety information